
ç¬?èª?- 高級編輯
我å�‘只使用了編輯面板上çš?b>添加關鍵é»?/b>工具, 其實這裏還有其它幾å�‹編輯工具也很有ç”?
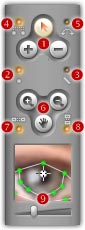
編輯工具
編輯工具面板上有3個用于編輯的工具 ( )
)
- 添加關鍵é»?/b> (
 ): å¦?a href="lesson3.html">ç¬?èª?/a>中所è¿? 你可以é�š過此工具é��å�‹添加關鍵點或調整關鍵點的位ç½? 這是æœ�常用的工å…?
 - 刪除關鍵é»?/b> (
 ): 通過此工具刪除任何不éœ�要的關鍵é»? 只需將光標移到該關鍵點上並點擊一下即å�?
 - 編輯關鍵é»?(
 ):
你可在源圖片上框選一組關鍵點, 然後可以通過編輯菜單或鍵盤操作來移動, 放縮, 裁剪, 刪除, 拷貝及粘貼它å€?
):
你可在源圖片上框選一組關鍵點, 然後可以通過編輯菜單或鍵盤操作來移動, 放縮, 裁剪, 刪除, 拷貝及粘貼它å€?
備注
- å¾?.0版開å§? 你可以直接用鼠標右鍵點擊的方法來刪除ä¸�個關鍵點而不ä¸�定要選擇刪除關鍵é»?/b>工具.
Edit Lines
Beginning version 4.0, you can use
lines to group and organize the key dots. Just choose the Dot Mode ( )
to add dots or Line Mode (
)
to add dots or Line Mode ( )
to add lines.
)
to add lines.
- Add ():
Continuously click the left mouse button to add a series of key dots connected
by a series of line segments. Hold the CTRL key and click somewhere to finish
the line and generate the last dot; hold the SHIFT key and click somewhere or
right-click somewhere to terminate the line and don't generate any new dot.
- Connect ():
If you click on a blank place, a new dot will be generated; if you click on
existed dots, you can connect them with lines. Please note that you can connect
a dot to any other dot.
- Insert ():
If you place a new dot on a line segment, the dot will be inserted into the
line.
- Delete (): Move
cursor on a line segment and click to delete the line segment, the two dots
connected by the line segment will not be deleted. If, however, you delete a
dot, all lines connected to the dot will be deleted automatically.
- Edit (): You
can drag a line segment to move it, all joint lines as well as the connected
dots will be moved together. If you click on a line, all key dots connected to
the line will be selected, you can then move, scale, cut, delete or copy them.
備注
- Adding lines will not affect the final morphing effects, but it makes the key dots grouped and organized clearly.
編輯選項
這裏æœ? 個用于控制添加關鍵點的選é ?
- 自動添加對應關鍵é»?/b> (
 ): 如果此選項是開啓çš? 在任ä¸�源圖片上添加ä¸�個關鍵點, 程序都將自動在對應圖片上的相應位置添加一個關鍵點. 如果此選項是關閉çš? 則允許你為任ä¸�源圖片單獨添加關鍵點.
 - A自動跳轉至對應關鍵點 (
 ):
如果此選項是開啓çš? 在任ä¸�源圖片上添加ä¸�個關鍵點å¾? 光標將自動跳轉到對應圖片上的相應位置.
):
如果此選項是開啓çš? 在任ä¸�源圖片上添加ä¸�個關鍵點å¾? 光標將自動跳轉到對應圖片上的相應位置.
備注
- 組合使用這兩個選項來確定你喜歡的模式. 例如, ä½?b>自動添加對應關鍵é»?/b>關閉ä½?b>自動跳轉至對應關鍵點是開啓的, 你將得到æœ�快捷的添加關鍵點的模å¼?
查看工具
編輯工具面板上有3個用查看視區的工å…? )
)
- 放大 (
 ), 縮小 (
 ): 選擇這兩個工具然後在視區上點擊一ä¸? 可使顯示å��域按å¾?2.5%åˆ?00%的比例平滑地放大或縮å°?
 - 調整視區 (
 ): 當編輯視å��不能完整地顯示源圖片æ™? 會出現相應的水平或垂直滾動條. 你可以é�š過直接拖放視區或使用滾動條來調整源圖片的可視部åˆ?
備注
- å¾?.0版開å§? 這組查看工具不僅可用于兩個源圖片, 對預覽窗口也同樣有效.
- å¾?.0版開å§? 你可以直接使用鼠標滾輪操作來調整視區而不ä¸�定非要使用é�™組工具, 同時, 使用鼠標滾輪操作時可使顯示區域最高放大至1600%.
查看選項
這裏æœ?個用于視å��同步的選é ?
- 源圖片視å��同步 (
 ):
當你縮放/平移兩å�‹源圖片中的ä¸�個時, 程序將自動縮æ”?平移另一個源圖片以使源圖片視å��同步.
):
當你縮放/平移兩å�‹源圖片中的ä¸�個時, 程序將自動縮æ”?平移另一個源圖片以使源圖片視å��同步. - 預覽視區同步 (
 ):
當你縮放/平移兩å�‹源圖片中的ä¸�個時, 程序將自動縮æ”?平移預覽視區以保持同æ? 反之亦然.
):
當你縮放/平移兩å�‹源圖片中的ä¸�個時, 程序將自動縮æ”?平移預覽視區以保持同æ? 反之亦然.
備注
- 通常情況ä¸? æœ�好使這兩個選項都保持開啓ç‹�æ…? 這樣兩å�‹源圖片和預覽視å��都將保持同步.
Magnifier
The Magnifier ( )
magnifies the area under and around the mouse cursor when you are working within
the source or target image. This enable you to have
good precision on delicate operation such as adjustment without having to zoom
in and out continuously. You can also drag the Magnifying Power Slider
to change the magnifying power from 1x to 4x.
)
magnifies the area under and around the mouse cursor when you are working within
the source or target image. This enable you to have
good precision on delicate operation such as adjustment without having to zoom
in and out continuously. You can also drag the Magnifying Power Slider
to change the magnifying power from 1x to 4x.