如何选择变形类型
使用奇幻变脸秀, 你可以使用任意两张图片创建morph影片, 或者仅使用一张图片创建warp影片. 软件中又细分为6种类型供你选择.

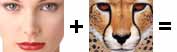
源图片1变形到源图片2
这是最常用的类型.
 |
|
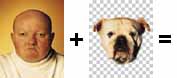
源图片1变形到源图片2且保留
这是一种特殊的类型仅用于创建部分变形效果时. 当你使用一张带透明层的32位图片作为源图片2时, 选择此种类型则源图片1将被保留, 而不会象选择上一种类型时那样会逐渐淡出. 从下例中可以看出, 选择这种类型可以生成仅有源图片1的一部分(此例中是头部)在进行变形的效果.
|
|
Warp源图片1
通常情况下, 当你创建一个warp影片时, 总是使用同一张源图片兼作源图片1和源图片2.
|
|
|
不过, 事实上你也可以使用两张不同的图片来创建warp影片. 如下例中所示, 源图片1参照源图片2的形状进行了变形, 但源图片2的特征并不和源图片1进行混叠.
|
|
|
Warp源图片2
如果选择这种类型, 产生的效果是源图片2参照源图片1的形状进行了变形, 但源图片1的特征并不会出现.
|
|
|
源图片1淡出
一种非常简单却有用的效果.
源图片2淡入
一种非常简单却有用的效果.
Direct
You won't see any morphing or warping effect if you choose this type. Normally, this is just that Image 1 stays there and Image 2 directly appears at the end of the morph. But if you set a Transition in Sequence Effect, you'll be able to create a nice photo slide show.
Morph Options
- Remove Triangles Connected to Corners: FantaMorph generally add 4 corners automatically while triangulating. If this option is checked, all triangles connected to 4 corners will be removed. In other words, FantaMorph will not use 4 corners for triangulation. This option is useful when you want to create a backdrop effect for the source image without alpha channel.
- Re-triangulate for Each Frame: FantaMorph generally triangulates the source images at the first frame of the morph. If this option is checked, FantaMorph will re-triangulate each intermediate frame.
Remarks
- The "Highlight Overlap Zone" option was removed from version 5. In version 5, if you use "Morph Image 1 to Image 2", all the overlap areas caused by mesh tangling will be highlighted, because this is helpful to resolve the problem if you place some key dots at wrong positions. If you don't want to highlight the overlap areas, just choose "Morph and Hold Image 1".